Showing posts with label HAND CRAFTING. Show all posts

Friday, 3 February 2012

Money belt 2012

R.O new project to launch. Not yet though, my sewing machines are already in the box.
This one I made as a gift, special for my girlfriend.

Monday, 11 July 2011

The Souvenirs

Yesterday.. my girlfriend had a party but I couldn't come. The party was full of fun and game.. so I would like to participate anyhow. I thought I might aswell make some souvenirs to give away to whoever come. I made hair scrunchies again bcoz I have many left over pieces around the house. I include my business card on them for promotion.

Sunday, 6 February 2011

Hair Scrunchies Up cycled

many of them.. super cute
You see.. I have so many small pieces left over material hangin' around my sewing table. There is only two things I can do to clear them out. Either chuck'em away (which is tear my heart..**sobs) or.. up cycled them. I actually lazy to start to creating new pattern in order to use my left over material.. so I come up with making "hair scrunchies". It;s easy... it's easy ...and it's EASYYYY!!
Basically my pattern is just a long rectangular. No particular size requirement to make this. I think the rectangular length should be double of your wrist. Oh.. you also need an elastic.
you can put it on your wrist like a bracelet or obviously to tie your hair.
Here.. in the shop they charge 5 euros each !! what a daylight robbery. better make one for yourself from now on..hahahah
Ladies with hair scrunchies on their wrist

Wednesday, 10 November 2010

Easy Document MALE (Unisex) Bag TUTORIAL

It is november! Almost my husband birthday. Last year I promised him a handmade jeans with many pockets like cargo pants.. but It never happened. I never find a proper pattern for it... -that's my excused everytime he asked- ..ouch!! So he never get his jeans ;(
This year.. I will make him a document (A4 size) bag to replace his old one (the one I made to accomodate his laptop at first but he use it to keep his car document..wallet and keys instead).
The design is pretty simple. It's a bag for male after all. I can't put ruffles or attach flower for instance. Has to be something practical!
so I would like to share the tutorial aswell.. oh dear I've been wanting to share something with you but hell no where I put my mind these days ;)
What you need to do :
- Pattern : that would be a rectangular. Mine is 37cmx32cm (Includes 1cm seam allowance). You may want to measure your own laptop or document..or anything. Cut 2 for outer fabric (I use denim/stiff fabric/thick fabric). Cut another 2 for lining (I use unknown fabric).
If you want to put the flap like mine... you need to make another rectangular.. mine size 29cmx12cm (includes 1cm seam allowance) . Cut curve the corner with scissor for nice look.
You need to sew these two together..leave the top edge completely open/un sew... for turning.
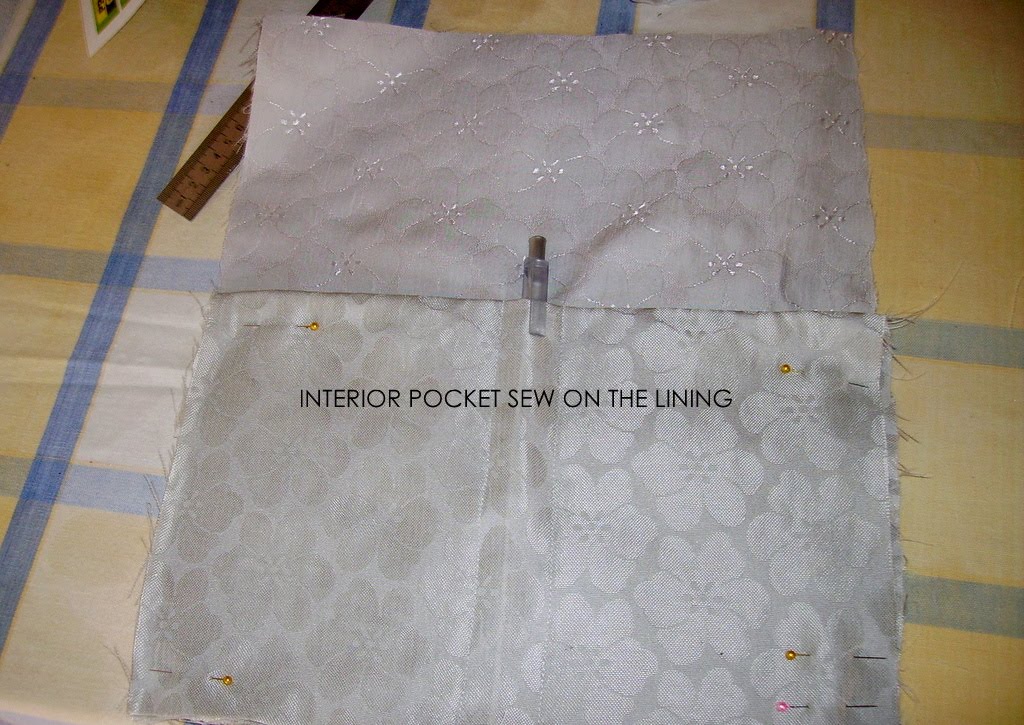
- Pockets : for outside and inside pockets I make another rectangular. Mine size 32cmx22cm Includes 1cm seam allowance.
You need to attach the pockets to the outer fabric and lining before you sew the fabric together.
In the middle.. I made two lines of top stitches for a pen.
Same method works for outer/denim exterior pocket.
Now you will have few pieces ready to be put together.
- Sew together the outer/denim fabric (right side facing each other).. same for the lining but leave 10cm open for the turning.
Attaching the flap to the back side of the bag using basting stitches.
The bag front view
- Long straps : Mine size 11cmx160cm Includes 1cm seam allowance. Cut it parallel with the grain of your fabric. Then you fold them in half - lengthwise- sew along the way (right side facing right side). After.. turn the fabric inside-out. Now you have a neat -clean long straps. Iron it... and top stitch all the way (you can skip this step if you want). You can use "ready made" straps. Any straps can do.
- Attach the strap to the side of the bag with basting stitch.
NOW IS THE TRICKY PART :
- Insert the outer bag into the lining (rightside facing each other) .. sew the top edge all around.
- Turn it inside-out through the opening. Top stitch the top edge of the bag... Iron it.
- Enjoy the bag ;)
NOTE : If by chance you use this tutorial.. I would like to see your version ;)..Happy crafting!

Sunday, 11 October 2009

RECYCLE Vintage Leather BAG

A while ago someone gave me a soft vintage leather jacket which was horrible. But b'coz its material so I thought I keep it. In case. Today when I'm feeling low.. I get the idea to make a bag out of it. Maybe can also give you an inspiration how to recycle thing. Now get your scissor ready.. So I dismantle everything on the jacket. Pieces and pieces.. doesn't need to be a perfect cut of piece. We are having fun here.. don't complicate your life..let your scissor take the rest. Then re-sew the pieces on top of each other into a one big piece. I folded in two and sew the side edges. It is recommended to use thread for a jeans.. basically strong thread than normal. Put the handle on the side and insert the lining (optional). I don't do zipper or pocket. I attach snap button though..also recycle from an old crap. Oh well.. at least the old jacket now has a new life until I get bore and wish for a new bag. So today moral lesson is not to throw away an old junk. Recycle them if possible. This world we are living in already occupied with rubbish. Lets together make a better living. What you need : -Any leather junk -scissor -Thread -fabric for lining (optional) -sewing machine (optional)..you still can sew by hand though. -willing..

Tuesday, 29 September 2009

Loop turning TIPS

Have you ever in a difficult situation of trying to turn the loop??? weather your about to making some straps or anything?Especially when the loop is stitch close on the end of it. Today I would like to share a little tips how to turn the loop..easily ^.^

Start with attaching a safety pin in the middle.. on the end of the strap

Then sew.. right side facing. All the way down till the end.

After you finish sewing.. push or pull up the safety pin (which now inside the loop already). Until you complete the turning. At this point you finish your turning. Iron your strap..Top stitch all around... and your strap ready to use.

I use this method to make straps for my obi belt. http://ritney.etsy.com

Have a really nice day for all the happy women outhere.

Sunday, 3 May 2009

Half Moon shape BAG

One hot sunny day came after a big rain the day before. I went to centro and had a look around with my NEW modified Charlie bag. Pretty huge isn't it.. Like it!!
Super star wannabe..Aha!
The whole look of d bag... Half moon shape.

Friday, 20 March 2009

Borneo printed bag

Hopi play inside mommybun's bag... can u see there is a printed Kalimantan map on it??!!
Weekend start today so I thought let me put my hand on sewing machine... and 40 minutes later i finished the unfinish-bag. The shoulder strap I bought in Leroy Marlin (1.60 euro/mtr). I struggle a bit on a circle side part... basically its a rectangle.. fold it make a tube..close the side part with round cut fabric. Insert zipper for opening.No pattern used.

Tuesday, 30 December 2008

RITNEY made in Italy

I made these hairband and put my own label. No ones birthday... christmas passed... just out of the blue. I think its lovely... my label I meant! I print it out myself yesterday... maybe I supposed to sell it and make some euros?????!!!!

Wrist Pin cushion

Lately I feel like doing hand crafting. I check on someone's blog about making a wrist pin cushion. Which is so usefull and cute. Everytime I need pins it is just on my wrist. because of the flower shape and pins attach to it- My husband call it "voodoo flower" hahahhahahahahha.. well named.