 Yesterday.. my girlfriend had a party but I couldn't come. The party was full of fun and game.. so I would like to participate anyhow. I thought I might aswell make some souvenirs to give away to whoever come. I made hair scrunchies again bcoz I have many left over pieces around the house. I include my business card on them for promotion.

Monday, 11 July 2011
The Souvenirs
Yesterday.. my girlfriend had a party but I couldn't come. The party was full of fun and game.. so I would like to participate anyhow. I thought I might aswell make some souvenirs to give away to whoever come. I made hair scrunchies again bcoz I have many left over pieces around the house. I include my business card on them for promotion.
Summer Sale 2011
 Summer Sale!!..I love sale... I bet you do aswell. Grab your favourite item.. go to check-out and INSERT the code : SUMMER2011 to get 20% off.
Visit www.ritney.etsy.com for more info.
Happy holiday everyone.
Summer Sale!!..I love sale... I bet you do aswell. Grab your favourite item.. go to check-out and INSERT the code : SUMMER2011 to get 20% off.
Visit www.ritney.etsy.com for more info.
Happy holiday everyone.
Thursday, 7 July 2011
SPOILER for August 2011 collection
 You may find The whole collections in www.ritney.etsy.com on august 2011 after I return from my holiday.
The material I am going to use is organic linen which superb for the summer heat, allow your skin to breath and look good at the same time.
You may find The whole collections in www.ritney.etsy.com on august 2011 after I return from my holiday.
The material I am going to use is organic linen which superb for the summer heat, allow your skin to breath and look good at the same time.
June 30 2011
 It was my b'day, on the 30th of june. And we went out for dine, took this picture... me in apple green dress. I made this dress already a while ago. Didn't get a chance to wear it until that day. The material is silky cotton, Indonesian batik printed which I bought in London. The design is tube dress, like it alot.. elegant yet relaxing.
Tuesday, 14 June 2011
Off Shoulder bat wing Mini dress
 Showing off a little part of your shoulder can be quite sexy. So I come up with this off shoulder bat wing mini dress which you can wear it with or without legging.
Making bat wing sleeve is easy enough, it just needs a lot of material because it's all one piece cut. Save you time to attach the sleeve though.
Due to the elastic material, you need a serger to work with it. Otherwise an easy project like this can turn into a nightmare if you use normal sewing machine. But anyway, that is my opinion.
Coming soon on www.ritney.etsy.com
Tuesday, 3 May 2011
Easy Petticoat and 50's flair Dress
I've been wanting to make 50's flair dress. But I also want it to be easy to wear without zipper nor buttons. After browsed around the net.. I figured one out that to make 50's look .. I need to wear petticoat underneath the skirt. I remember when I was a kid.. I used to hate it.. usually made from tulle and makes me itchy and hot. So this time I thought I would skip the tulle and use lace instead for the bottom part. The key is to gather the lace so that it creates ruffles to lift your skirt a bit.


My quick and easy petticoat. Does the job though. I don't particularly follow any pattern just read a few instructions from the net.

My strapless-buttonless-zipperless 50's flair dress with petticoat underneath.

Sunday, 24 April 2011
Pencil Skirt
Inspired by Victoria B pencil skirt. 
Any normal pencil skirt pattern would do.. just add the length a bit to cover your knee.
Even better if the material is slightly stretch like mine.. and make a slit at the back so allows you to walk easily.

Animal printed Jacket made by me
Pencil skirt made by me
Happy Easter 2011
Still in Bologna... happy easter everyone ^_^


Crack up eggs after the "egg battle"

eggs chocolate!
Monday, 18 April 2011
SHORT BREAD COOKIES

Today I made shortbread as a promised to my husband. I found the recipe on the net. Make alteration on sugar because it's too sweet for my taste.
The ingredients are these :
self raising flour 180gr
sugar 40gr
butter 125gr
beat together sugar and butter then add the flour. shape the dough and leave in the fridge for 20 minutes. Bake 180 degree for 10-15 minutes. Keep on eye bcoz it's cook quickly.
Wednesday, 13 April 2011
Best mate of mine
I inherited this beauty from my husband grandfather. He used to make man suit with this machine. Basically that time he made a living with this.
It is kind of vintage but works like an industrial machine. My favorite!


My serger machine. My favorite number two.

First sewing machine I bought. Very usefull bcoz its "arm free".
Saturday, 2 April 2011
Modern Kimono
 I like to read Japanesse manga, I like J-drama, I like everything about Japan. I would like to visit Japan one day. I hope it won't be just a wishful thinking ^.^
oh, I forgot to say I also like kimono. Modern kimono because the real kimono it's seems hard to put on while I like something practical.
I made this modern kimono the other day after I saw Barbie doll with short-modern-geisha style-kimono on shop etalase. Caught my attention, caught my heart aswell ;)
I went home and started to browse around on the net, look for the instructions on how to make simple kimono, even learn on how to wear the real kimono, that's why I came to the conclusion on how ...err..hard to put it on is the real kimono?!
The pattern I drafted myself so considering this still a prototype modern kimono, a few faults here and there but I will come to perfection anway.
I have two points why I chose camouflage fabric. first bcoz that is the only sufficient fabric I have.
Second is bcoz camouflage is hit the high street fashion again here in Bologna. I don't know other places.
To make one kimono, I use something like 3 meters of fabric. Many long pieces left over so I use it to make straps for the belt.
I really mean it by making the belt, I made modern obi belt to go with the kimono. The belt part I use military green cotton, and the straps come from the camouflage fabric left over.

I wore the kimono for the party the other day and I received many compliments and comments from the ladies.. the gentlemen and also from KIDS!!
One of my friend said... "oh.. I didnt know you r coming... I couldnt see you"
I said : "how come?!"
she said : "well.. it's bcoz you wear CAMOUFLAGE!!!"
hahahahah it was joke of the day.
Wednesday, 2 March 2011
Batik Skirt

Will be great for summer. I just hope she will enjoy the skirt as much as when I made it.

My mannequin is slimmer than a normal person.. so I need to pin the skirt in order for the skirt to stay there. You may notice that the shape is a bit unbalance for that reason.

The final result... she wore the skirt and kindly took this picture.
Two Tone Blazer


Anyway, the pattern I drafted from Burda MAG. No try out first on musli, I just cut straight onto my real material. I use two different colour fabric bcoz I couldn't decide on which colour I supposed to work on. But having a two tone colour blazer should make the show go, right?!
The button is basically anything flat and round with facial cotton on it, wrapped with fabric. And for the button hole, I make button loop instead bcoz I'm afraid to spoil the fabric if I make a hole on it.
Inside is line with black lining. I use the same pattern to make the lining.
If you notice, I made a mistake on the collar and on the sleeves. I had a hard time to inserted the sleeves. I did follow the instruction, it just didn't correspond enough. I won't talk about it, I just want to enjoy my blazer now ;)
Sunday, 6 February 2011
Hair Scrunchies Up cycled

many of them.. super cute
You see.. I have so many small pieces left over material hangin' around my sewing table. There is only two things I can do to clear them out. Either chuck'em away (which is tear my heart..**sobs) or.. up cycled them. I actually lazy to start to creating new pattern in order to use my left over material.. so I come up with making "hair scrunchies". It;s easy... it's easy ...and it's EASYYYY!!
Basically my pattern is just a long rectangular. No particular size requirement to make this. I think the rectangular length should be double of your wrist. Oh.. you also need an elastic.

you can put it on your wrist like a bracelet or obviously to tie your hair.

Ladies with hair scrunchies on their wrist

Sunday, 23 January 2011
How to use Purse Organizer
 Everytime friends sees my purse organizer http://www.etsy.com/listing/64873572/organizer-purse-autunno inside my handbag... they only comment would be : "oh..such a cute little bag..but what is that for?". Then I need to explain what's that little purse doing inside my handbag.
I realize for some .. the usefullness of purse organizer is not that obvious.
Here's I show some pictures of how purse organizer will makes our daily life easier..
See how mess is inside my handbag.
 See how I organize my essential inside purse organizer.


See how I lift the handle of purse organizer and put it inside my handbag.

See how is very quick to do bag exchange everytime.
 See how everythng looks neat inside my handbag.
 See how everythng looks neat inside my handbag.
Tuesday, 21 December 2010
Purse Organizer
First of all I need to thank my girlfriend Tari whom helps me to click an idea into my head the other time ;D.


So anyway.. most women I think they have more than one handbag. I mean.. I'm not such a bag lover but I do have more than one. And I do like to change my bag once in a while.. some women even change their bag everyday. Imagine the time you spend to remove all of our "woman gadget" such mobile phone.. another mobile phone... lipstick..a packet of tissue... wallet..keys.. etc..etc.. everytime you change a bag?!
Then when your mobile phone ringing.. you need to dig and dig inside your bag to finally find it when it stops ringing..;(
For all of that reasons.. I create this "organizer purse" to accomodate all your essential with only one move. Grab the handle and move it to another bag. You won't leave anything behind anymore from now on.

You can find this organizer purse on www.ritney.etsy.com


Tuesday, 23 November 2010
Christmas 2010 Preparation
Christmas 2010 is coming. And like every other year.. I always struggling what to give to people close to me. Something (if possible) that is not too common such handmade stuff. So my husband said to me to try to make a few bags as a gift. There then I started again.. from one become two and so on.. oh well then I may aswell make more and more bags for www.ritney.etsy.shop


So that people..special person like you can also have a special handmade bag from Ritney's.

Pile of fabric

pieces after cutting
Wednesday, 10 November 2010
Easy Document MALE (Unisex) Bag TUTORIAL
It is november! Almost my husband birthday. Last year I promised him a handmade jeans with many pockets like cargo pants.. but It never happened. I never find a proper pattern for it... -that's my excused everytime he asked- ..ouch!! So he never get his jeans ;(

 Now you will have few pieces ready to be put together.


This year.. I will make him a document (A4 size) bag to replace his old one (the one I made to accomodate his laptop at first but he use it to keep his car document..wallet and keys instead).
The design is pretty simple. It's a bag for male after all. I can't put ruffles or attach flower for instance. Has to be something practical!
so I would like to share the tutorial aswell.. oh dear I've been wanting to share something with you but hell no where I put my mind these days ;)
What you need to do :
- Pattern : that would be a rectangular. Mine is 37cmx32cm (Includes 1cm seam allowance). You may want to measure your own laptop or document..or anything. Cut 2 for outer fabric (I use denim/stiff fabric/thick fabric). Cut another 2 for lining (I use unknown fabric).
If you want to put the flap like mine... you need to make another rectangular.. mine size 29cmx12cm (includes 1cm seam allowance) . Cut curve the corner with scissor for nice look.
You need to sew these two together..leave the top edge completely open/un sew... for turning.

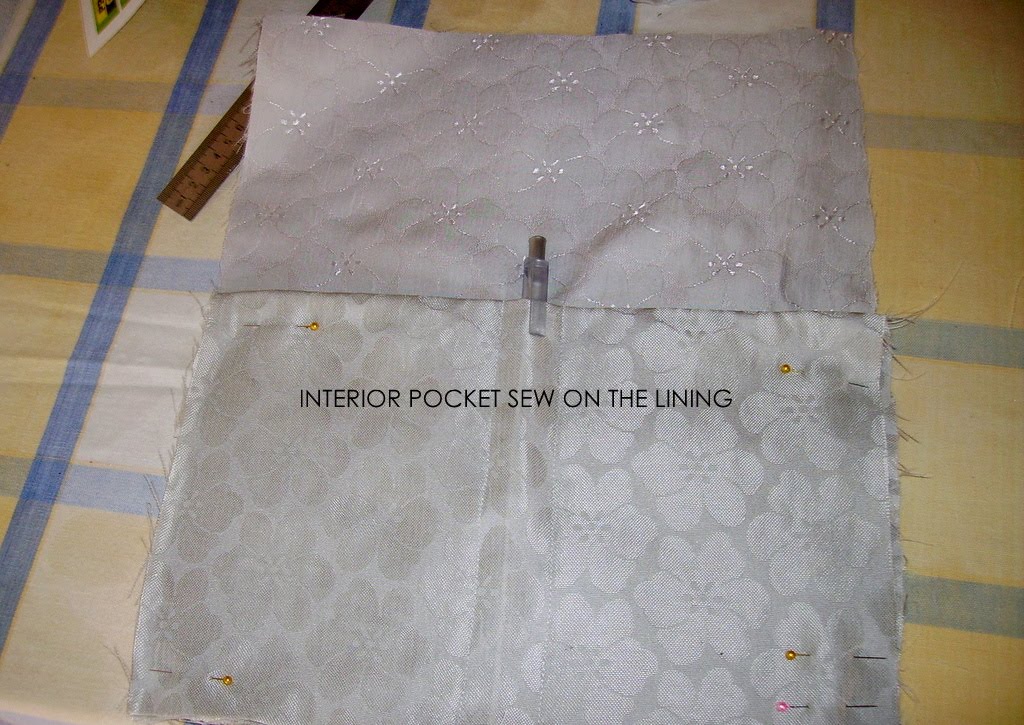
- Pockets : for outside and inside pockets I make another rectangular. Mine size 32cmx22cm Includes 1cm seam allowance.
You need to attach the pockets to the outer fabric and lining before you sew the fabric together.
In the middle.. I made two lines of top stitches for a pen.
Same method works for outer/denim exterior pocket.
 Now you will have few pieces ready to be put together.
- Sew together the outer/denim fabric (right side facing each other).. same for the lining but leave 10cm open for the turning.


The bag front view
- Long straps : Mine size 11cmx160cm Includes 1cm seam allowance. Cut it parallel with the grain of your fabric. Then you fold them in half - lengthwise- sew along the way (right side facing right side). After.. turn the fabric inside-out. Now you have a neat -clean long straps. Iron it... and top stitch all the way (you can skip this step if you want). You can use "ready made" straps. Any straps can do.

- Attach the strap to the side of the bag with basting stitch. 

NOW IS THE TRICKY PART :
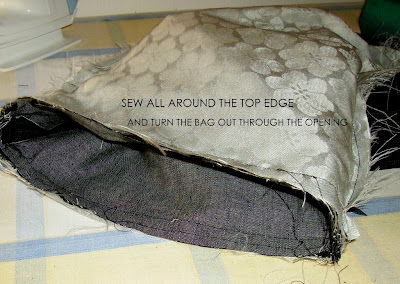
- Insert the outer bag into the lining (rightside facing each other) .. sew the top edge all around.
 .. sew the top edge all around.
- Turn it inside-out through the opening. Top stitch the top edge of the bag... Iron it.


- Enjoy the bag ;)
NOTE : If by chance you use this tutorial.. I would like to see your version ;)..Happy crafting!
Subscribe to:
Posts (Atom)